A Fair Value Gap (FVG) is a price imbalance left on the chart when large institutional orders move the market too quickly, leaving behind an area where price did not trade efficiently. In ICT and Smart Money Concepts (SMC), FVGs are one of the core tools for finding high-probability entries.
This guide covers what FVGs are, how to spot them, and how to actually trade them - with examples across forex, crypto, and stocks.
What Is a Fair Value Gap?
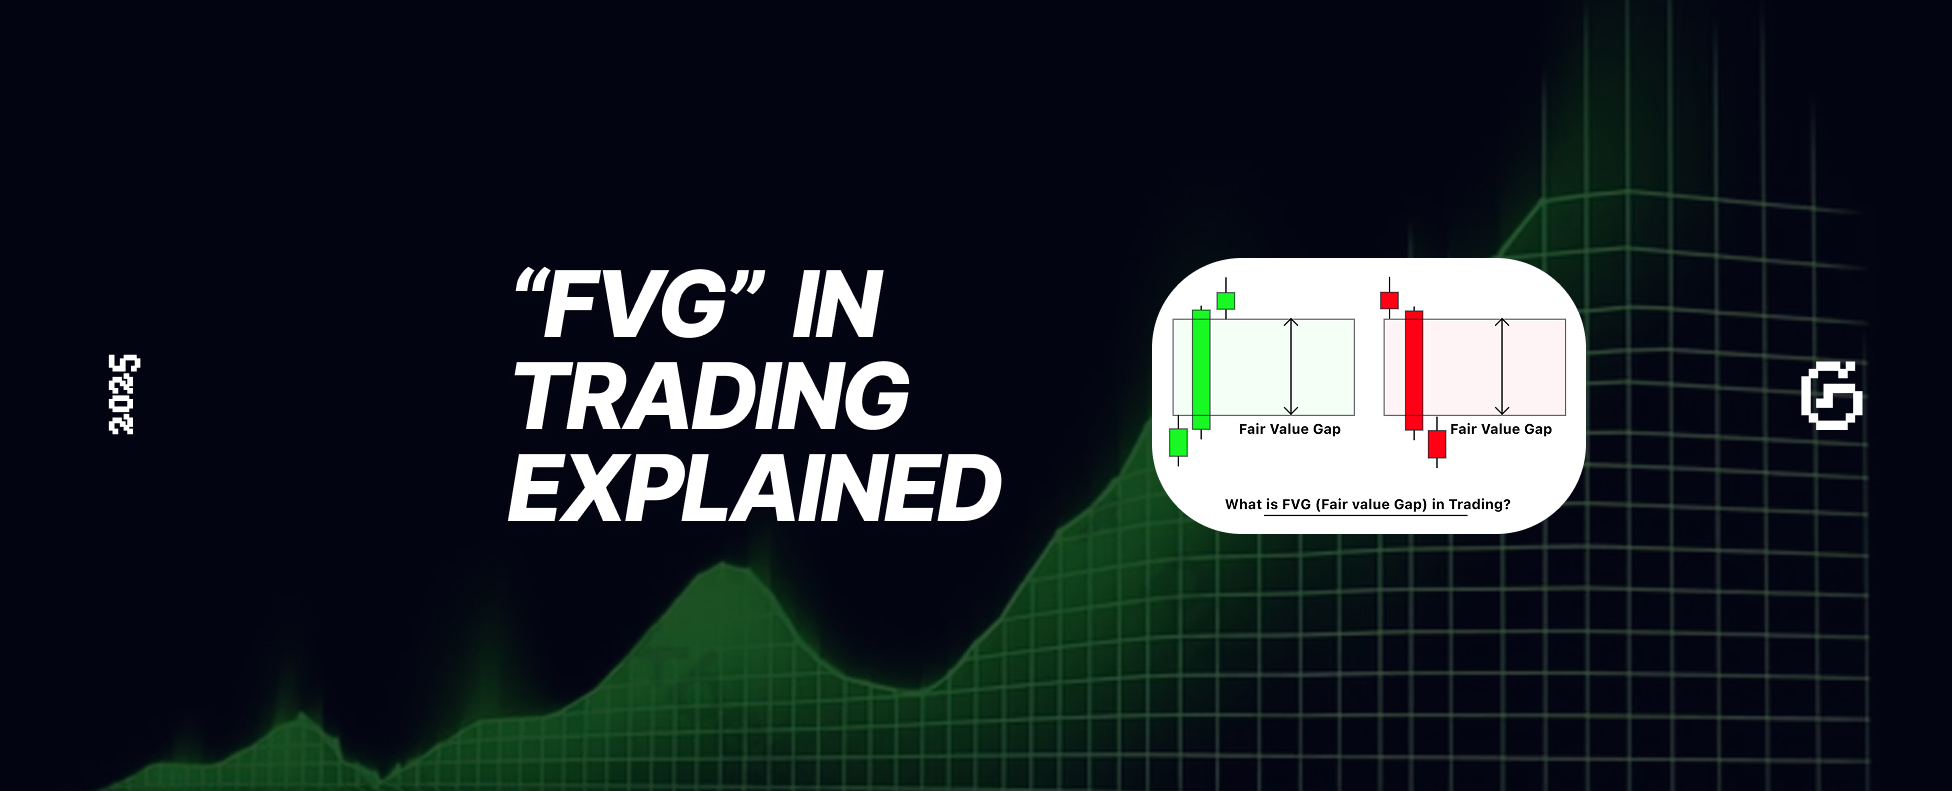
A Fair Value Gap represents an imbalance between buyers and sellers on a candlestick chart. It happens when price moves so fast in one direction that no counter-trades fill a certain price range.
In practical terms: it is the gap between the high of one candle and the low of another, created by a strong impulsive move in between. Price tends to return to these areas later to "fill" the imbalance before continuing.
Think of it as unfinished business. Institutions moved price too quickly, and the market often comes back to settle what was left behind.
The 3-Candle FVG Pattern
Every FVG comes from three consecutive candles:
- Candle 1 - the candle before the impulse
- Candle 2 - the strong impulsive candle (this is the move)
- Candle 3 - the candle after the impulse
For a bullish FVG: if the high of Candle 1 is below the low of Candle 3, the space between them is the fair value gap. That is the zone where price moved through without trading efficiently.
For a bearish FVG: if the low of Candle 1 is above the high of Candle 3, you have a bearish gap.
The FVG pattern has three defining characteristics:
- It forms during strong impulsive moves, not slow grinds
- It signals unbalanced order flow - one side overwhelmed the other
- It creates a retracement or reaction zone that price often revisits

Why FVGs Matter
Fair Value Gaps show you where price is likely to correct before continuing in its main direction. Institutions tend to fill these gaps to restore equilibrium before making the next move.
This gives you three practical advantages:
- Better entries. Instead of chasing an impulse, you wait for price to retrace into the gap and enter at a discount.
- Cleaner stop placement. The edges of an FVG provide natural stop-loss levels. If price blows through the entire gap, your thesis is likely wrong.
- Trend continuation signals. When price fills the gap and then bounces, that is confirmation the original move still has momentum.
FVG in Forex
In forex, fair value gaps are especially common on major pairs during high-volatility sessions - London open, New York open, and during major news releases.
When institutions execute large orders, pairs like EUR/USD or GBP/USD can surge quickly, leaving imbalances behind. Here is a typical scenario:
- A bullish impulse on EUR/USD creates a gap during London open
- Price continues higher for a few candles
- During a quieter period, price retraces back into the FVG zone
- On rejection from the gap, traders enter long - aligned with institutional order flow
This is why the FVG forex strategy is popular among SMC traders. It gives concrete entry levels instead of vague "support and resistance" zones. For the full forex treatment - the best sessions and pairs, plus a pip-by-pip worked trade with lot sizing - see our dedicated guide to fair value gaps in forex.

Where FVGs Come From - ICT and Smart Money Concepts
The fair value gap concept comes from Smart Money Concepts (SMC) and ICT (Inner Circle Trader) methodology. Michael J. Huddleston (ICT) popularized the term, teaching traders how these inefficiencies represent liquidity voids that price seeks to rebalance.
The core idea: retail traders see "support and resistance." Institutional traders see liquidity and imbalances. FVGs are one way to read the institutional footprint - areas where big money moved price and left evidence on the chart.
Over time, this framework became a core part of institutional trading education, used by thousands of traders across forex, crypto, and futures.
How the Fair Value Gap Works - Step by Step
-
Institutional entry. Big players enter with large orders, pushing price sharply in one direction.
-
Imbalance forms. The market moves too fast for opposite orders to fill, creating a gap on the chart.
-
Retracement. Price later returns to that unbalanced area to fill missing orders. This is the opportunity.
-
Continuation or reversal. After filling the gap, price either continues in the original direction (if the trend is intact) or reverses (if liquidity conditions changed).

How to Identify Fair Value Gaps
1. Find Three Consecutive Candles
Look for a strong impulsive candle (Candle 2) sandwiched between two others. The impulse should be visually obvious - not a slow grind.
2. Check for Displacement
For a bullish FVG: Candle 1's high must be below Candle 3's low. The space between is your gap. For a bearish FVG: Candle 1's low must be above Candle 3's high.
3. Mark the Zone
Draw a rectangle between Candle 1's high and Candle 3's low (bullish) or Candle 1's low and Candle 3's high (bearish). That is your FVG zone.
4. Wait for Price to Return
Do not trade the FVG on formation. Wait for price to come back to the zone, then watch for rejection or continuation as confirmation.
FVG Entry Strategy
Here is a concrete approach to trading fair value gaps. (For the complete step-by-step process - qualifying the gap, timing the entry, placing stops and targets, and a full worked trade - see how to trade fair value gaps.)
Step 1. Identify an FVG after a strong impulsive move. The gap should be clean - large impulse candle, visible space between Candle 1 and Candle 3.
Step 2. Wait for price to retrace into the gap zone. Do not enter on the impulse itself. Patience here is what separates good FVG trades from chasing.
Step 3. Confirm entry with a reaction. Look for:
- A reversal candlestick pattern (engulfing, pin bar) at the gap
- A lower timeframe break of structure back in the original direction
- Volume picking up on the bounce
Step 4. Set your risk and targets:
- Stop loss: beyond the far edge of the FVG
- Take profit: at the next liquidity zone, previous high/low, or an opposing FVG
A typical bullish FVG trade: price rallies, creates a gap, retraces into the gap, rejects, and continues to new highs. Your entry is on the rejection, your stop is below the gap, and your target is the next key level.

Bullish vs Bearish FVGs
| Type | How it forms | What to do |
|---|---|---|
| Bullish FVG | Strong upward impulse leaves a gap below | Wait for price to retrace into the gap, enter long on rejection |
| Bearish FVG | Strong downward impulse leaves a gap above | Wait for price to retrace into the gap, enter short on rejection |
The logic is symmetrical. A bullish FVG is a buying opportunity on a pullback. A bearish FVG is a selling opportunity on a rally. In both cases, you are trading with the institutional flow, not against it. For how each type sets directional bias and what each says about order flow, see bullish vs bearish FVG.
Combining FVGs with Other SMC Tools
FVGs on their own are useful. Combined with other confluences, they become powerful:
- Order Blocks - when an FVG overlaps with an order block, the zone carries extra weight (confused about the difference? See FVG vs order block vs liquidity void)
- Break of Structure (BOS) - an FVG formed after a BOS confirms the new trend direction
- Liquidity sweeps - if price swept liquidity (stop hunts) before filling an FVG, the setup is higher probability
- Higher timeframe confluence - an FVG on the 4H chart is more reliable than one on the 5-minute chart
When multiple factors align at the same zone, you have a high-conviction setup.
Common FVG Mistakes
Entering before the fill. The FVG is not a signal to enter immediately. It is a zone to watch. Wait for price to come back and show a reaction.
Trading every single gap. Not all FVGs are worth trading. Focus on gaps created by strong impulsive moves with clear displacement. Small gaps in choppy markets are noise. Our guide to valid vs invalid FVGs covers the qualification rules in detail.
Ignoring the bigger picture. An FVG on a 1-minute chart inside a larger downtrend is not a reliable long setup. Always check the higher timeframe context.
No stop loss. "Price always fills the gap" is not a law. Sometimes price blows right through. Always define your invalidation level before entering.
Tracking Your FVG Trades
If you trade FVGs regularly, tagging them in a trading journal helps you track which specific FVG setups work best for you. Over 50-100 tagged trades, you will see clear patterns: which timeframes produce the best FVG entries, which pairs react most cleanly, and whether your win rate differs between bullish and bearish gaps.
This kind of data turns a theoretical concept into a measured, personal edge.
FAQ
Do all fair value gaps get filled?
No. Some FVGs never get filled, especially those formed during very strong trends or during major fundamental shifts. The idea that "all gaps must fill" is a simplification. Use FVGs as potential reaction zones, not guaranteed destinations.
What timeframe is best for FVG trading?
Higher timeframes (1H, 4H, Daily) produce more reliable FVGs because they reflect larger institutional activity. Lower timeframes (1M, 5M) have more gaps but also more noise. Many traders use a top-down approach - identify FVGs on higher timeframes, enter on lower timeframes.
Is FVG trading the same as gap trading?
Not exactly. Traditional "gap trading" usually refers to overnight or weekend gaps between close and open prices. FVGs are intraday imbalances within candlestick sequences. The concept is related but the mechanics are different.
Can I use FVGs in crypto?
Yes. FVGs work on any instrument that has a candlestick chart - forex, stocks, crypto, futures. Crypto markets tend to produce large FVGs due to high volatility, especially around major liquidation events. See our dedicated guide to fair value gaps in crypto for BTC/ETH examples and how leverage changes the math.
Go Deeper: The Full FVG Series
- How to Trade Fair Value Gaps - the step-by-step entry strategy with a worked trade
- Valid vs Invalid FVG - which gaps are worth trading and when an FVG is invalidated
- Bullish vs Bearish FVG - reading directional bias and order flow
- FVG vs Order Block vs Liquidity Void - how the three SMC concepts differ and stack
- Fair Value Gaps in Forex - sessions, pairs, and pip-by-pip lot sizing
- Fair Value Gaps in Crypto - BTC/ETH examples, liquidations, and leverage
Related Tools and Guides
- Risk-Reward Ratio Calculator - Calculate your R:R before entering an FVG trade
- Position Size Calculator - Size your FVG entries based on your risk tolerance
- Best Day Trading Journal in 2026 - Track and review your FVG trades over time
- What Is the 90/90/90 Rule in Trading? - Why most traders fail and how to beat the odds